


😀😀😀Download, Demo and Buy Blue Iris: http://www.hometechdiy.com/buy-blue-iris/
👍 Link to identify if processor uses Quick Sync Video: https://ark.intel.com/content/www/us/en/ark.html#@Processors
👍 RLC-511 Camera:https://bit.ly/2IFauW4
👍 Check out more information on my Blog: http://www.hometechdiy.com/blue_iris_optimizations/
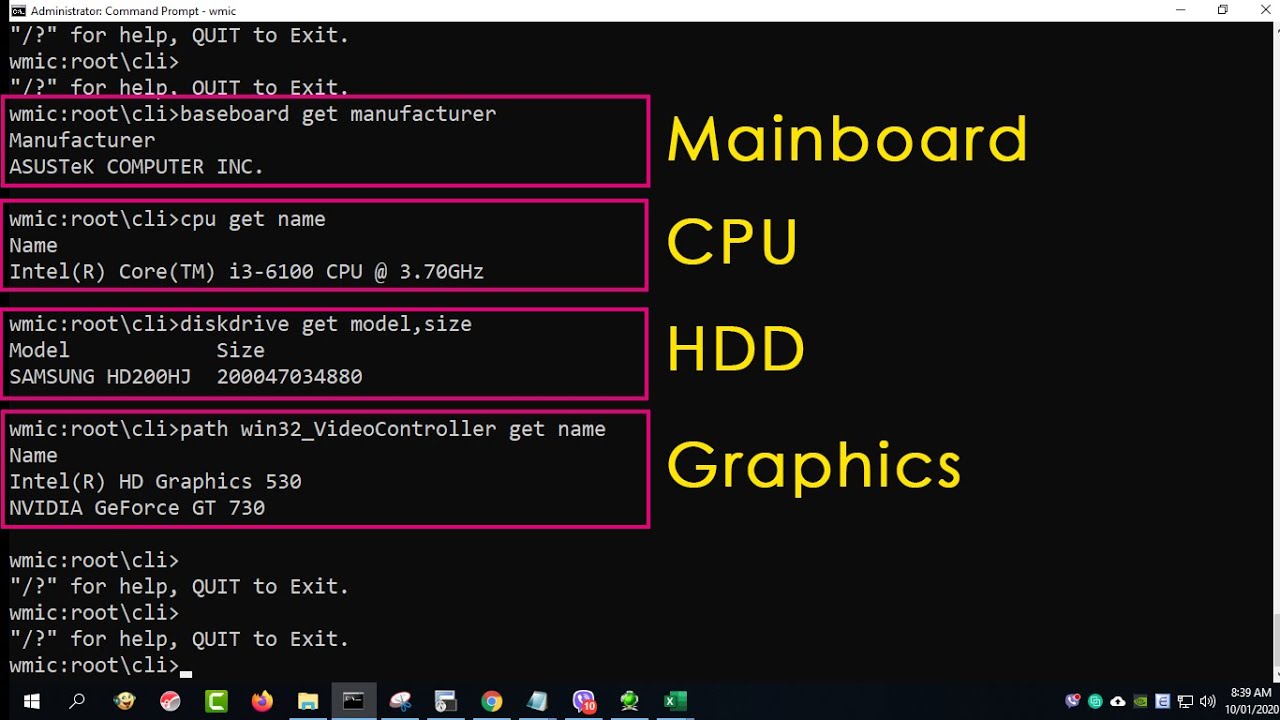
💻💻 My PC Build:
Crucial NVMe M2. P1 SSD – https://amzn.to/2XwiPyX
8TB Wester Digital Purple Hard Drive: https://amzn.to/2ZXHb6d
Asus Maximus 8 Hero Z170 – https://amzn.to/3i4qMVs
Intel Core i7 6700K processor – https://amzn.to/2MZdqPb
Corsair H100i V2 liquid cooler – https://amzn.to/3i6Kzna
32 gigs of DDR4 3200MHz of RAM by Corsair – https://amzn.to/35zd1sX
Samsung 500gig SSD – 850 EVO – https://amzn.to/2LIC45G
Asus RX470 4GB video card (or similar) – https://amzn.to/3ox4zSu
850w EVGA Gold Power Supply (or similar) – https://amzn.to/3sfvXqo
Today, we are installing and optimizing the security surveillance management software Blue Iris. This software is resource intensive and without the proper configuration, your security camera system may experience errors, lost surveillance footage, crashes or even total failure. If you are new to Blue Iris, welcome because we are going to download the software, install it, buy a license, run through the initial setup steps and add some cameras. I will show you 11 performance tips to optimize the software to keep your PC running at its best.
For those of you who watch my channel know that I’m a big fan of the video monitoring and recording software Blue Iris. In the past, I’ve struggled first hand with the software’s performance issues, system crashes and coming home to lost footage, error messages and even the blue screen of death. With the latest version 5 and, a clean PC, and a handful of optimization tips, performance is about to change.
The PC that I will be using today was recently restored back to defaults. I also presented its spec in another video. Please check that out to become familiar with its hardware.
Since this video is about setting up Blue Iris and optimizing its performance, and in this video I define MY optimal performance. This is a subjective matter with many dependencies, like the PC hardware, other programs installed on the machine, number of cameras and resolution and even expectations of the software.
I walk through the steps of downloading and installing the software. I then purchase a license key to gain access to all the features.
Here is a list of the performance features and the additional setting I discuss.
1. Hard drive configuration – ensuring the computer has at least 1 SSD and a mechanical drive.
2. Postponing Windows updates so they don’t restart the PC unexpectedly. I also ensure the power setting don’t allow the machine to go to sleep.
3. File save locations are important. Ensure Blue Iris’s database is saved on an SSD. Also place New files on this drive. The archive or stored files can go on the slower WD purple drive.
4. Use direct to disc recording to eliminate re-encoding
5. Configure each camera and Blue Iris to record at 15 fps. Any more than this doesn’t provide much of an advantage and uses resources.
6. A global setting for FPS can reduce the frames shown on the display without impacting the recordings.
7. Use of the sub stream profiles will display each camera in lower resolution while continuing to record in full resolution.
8. Recording this sub stream helps in playing back multiple cameras’ footage at once since the resolution is lower.
9. Restricting the amount of data used by Remote Desktop also can bring down the CPU numbers by decreasing the refresh rate.
10. Intel’s quick sync video takes some of the load off of the CPU as well.
11. When using Blue Iris as a Windows Service, the user interface is not showing but the application continues to run in the background.
I also show the performance numbers when Blue Iris is moving around files. Lastly, I discuss my optimizations that I personally use.
Lot’s of great information with many examples!
source


